A content creator's guide to maximize YouTube earnings
How much does YouTube actually pay? How many video views do you need? In this guide we'll look at some of the effective methods for making money on the platform.
Read this article →There are a few ways to set up Twitch donations. You could use Streamlabs, PayPal, or something else. In this article, we’ll explain how to add a donations button on Twitch, and cover several of the available payment options (even without PayPal).
We’ll also cover the impact of the Brave browser and the ease of using Brave Rewards to send and receive donations.
The first step to setting up your Twitch donations is to decide which donation methods you want to use. These are some of the most popular.
Twitch Bits (the official Twitch donation system) are purchased directly via Amazon payments. Bits are Twitch’s version of a digital currency, and can be used to pay for special audio and visual alerts, called “Cheers.” Cheers are also displayed in the special badges in a chat; the more Bits used, the higher the badge. To enable Twitch Bits on your channel:
Paypal is arguably the easiest way to accept payment on Twitch, but it does have some drawbacks: There’s an increased risk of fraud, and PayPal adds an extra step in the payment process.
To set up PayPal for donations:
Note: One of the downsides to using Paypal is chargebacks, where scammers pay using Paypal and then file a complaint with Paypal that they never received anything in return. Paypal usually sides with the buyer and withdraws the sum from the account. For many users, chargebacks alone are a reason to avoid using Paypal, despite the popularity and ease of the service.
Crypto is another popular payment method on Twitch, because crypto transactions are relatively frictionless (i.e. users don’t need to set up any additional accounts if they already have a crypto wallet). Twitch creators can easily share their wallet address directly with viewers to solicit crypto donations. The most common issue with crypto donations, however, is sending the right type of crypto asset to the right type of crypto wallet address. For instance, Bitcoin cannot be sent to an Ethereum wallet, so labeling each address correctly is a must.
To share your crypto address on Twitch:
The Brave browser’s built-in rewards system—Brave Rewards—makes it even easier for viewers to tip their favorite Twitch streamers with crypto. Brave users can tip Twitch streamers directly with Basic Attention Token (BAT) that they earn from viewing private ads while browsing. By registering as a Brave Creator, viewers enrolled in Brave Rewards can seamlessly tip you with BAT.
There are also a variety of third-party services to collect donations for Twitch users. Sites like Muxy, StreamLabs, Stream Elements, and Gaming for Good all create a donation page on their specific server which viewers can visit and donate. To get started:
The best way to solicit donations on Twitch is to verbalize your donation link while streaming. Let viewers know where—and how—they can donate to you. If you’re a small channel, you could also create a list on your channel page for top donors, which publicly thank donors and encourage repeat donations. Keep in mind that while donations are a helpful way to make some revenue on Twitch, larger accounts generally use Twitch Subscriptions to make the majority of their Twitch income.
The Twitch platform fits naturally into the new Brave Internet economy. Third-party ads don’t work as well on Twitch; the majority of the ways to make money on Twitch rely on building relationships with audiences.
Brave, with its focus on user security and privacy, provides an easy way for Twitch streamers to draw increased revenue. Brave lets Twitch viewers bypass all the third-party donation systems, tipping their favorite streamers directly.
How much does YouTube actually pay? How many video views do you need? In this guide we'll look at some of the effective methods for making money on the platform.
Read this article →Ever wonder how much the top streamers on Twitch make? We’ll look at some of the numbers behind Twitch streamer income, and how the Brave browser could benefit them.
Read this article →Want to know what the requirements are to to become an Affiliate or Partner on Twitch? This guide tells you what's needed to get started and offers tips on how to earn from these programs.
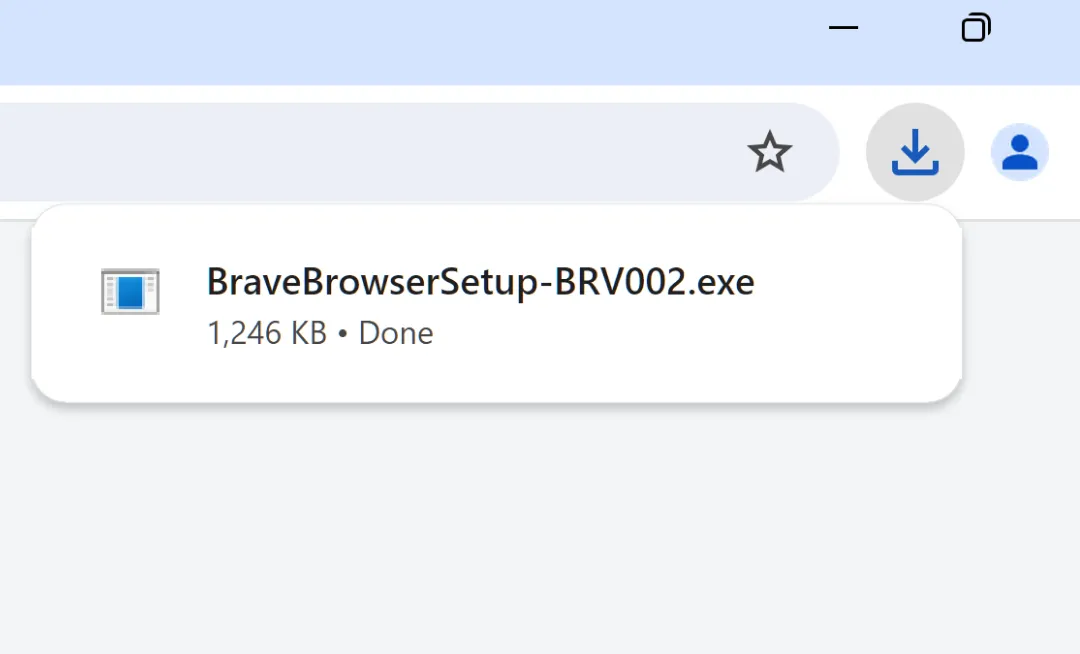
Read this article →Open the installer from Chrome's downloads (it should be in the upper right corner of this window).
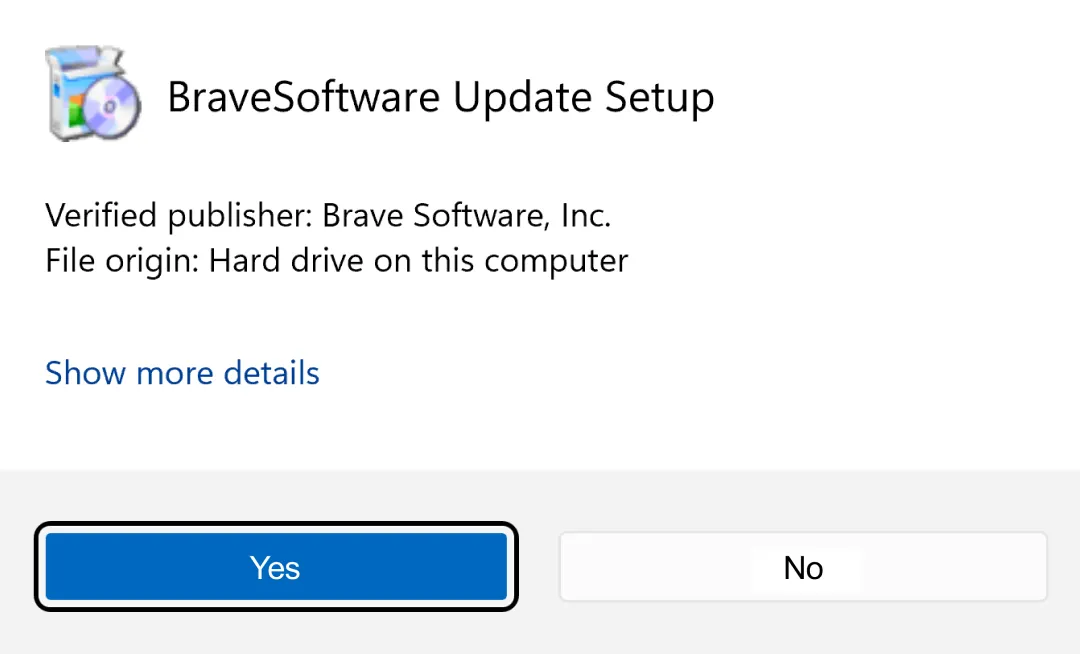
If you're prompted to, click “Yes” in the User Access Control dialog.
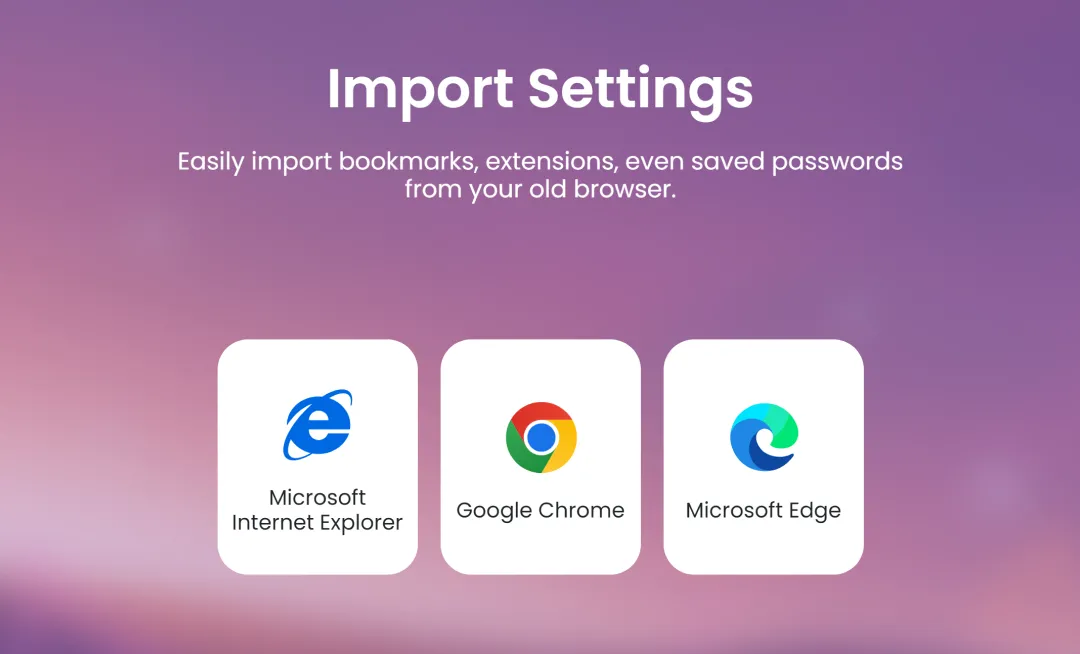
Wait for the installation to finish, then import your browser settings from Chrome.
If your download didn’t start automatically, click here.